Thursday, March 26, 2009

Roast Beef w/ Spicy Parsley Tomato Sauce


We had this last weekend and I can only say Tom out-did himself on this one!
If you're lucky enough, maybe some night you will stop by for dinner with the Sheasby's and we'll be serving this one -only to be topped off with Apple Tart!


Roast Beef with Spicy Parsley Tomato Sauce


Prep Time: 30 minutes
Cook Time: 40 minutes to 1 hour [depending on how well-done you want]
Serves: 4-6

Ingredients:
1 [2-2.5 pound] Sirloin tip or beef chuck roast
3 T Olive Oil
4 Roma Tomatoes, cut in half
2 tsp Herb de Provence
Kosher salt and freshly ground pepper

Spicy Parsley Sauce
1 1/2 C fresh parsley
2 garlic cloves
1/2 tsp red pepper flakes [more or less depending]
3/4 tsp kosher salt
3/4 tsp freshly ground pepper
2 T red wine vinegar
1/2 C extra-virgin olive oil

Directions:
Roast: Preheat oven to 375 degrees F
Season the beef with salt and pepper. Season the tomatoes with salt, pepper and herb de Provence.
Place a medium, heavy roasting pan or dutch oven over high heat. Heat the olive oil. Sear the beef over high heat on ALL sides.
Turn off heat. Place seasoned tomatoes around the seared beef and place the pan in the oven.
Roast until the beef reads 130 degrees F [for medium rare], 30-40 minutes.
Take the roast out of the oven, tent loosely with foil and let rest for 10-15 minutes. the internal temperature of meat should rise 5 degrees more and the juices will re-distribute into the roast.

Sauce:
Place the parsley and garlic in a food processor and pulse until finely chopped. Add the red pepper flakes, salt, red wine vinegar and the roasted tomatoes from beef pan and process until pureed. Add the olive oil in a steady stream with the machine running.

To Serve:
Slice the roast and place on a serving platter. Drizzle a little sauce over the meat. Serve the remaining sauce in a small bowl along side.

Recipe Courtesy of Food Network and Giada De Laurentiis -MWUAH!

Enjoy! ~Breeze

Monday, March 9, 2009

Sourdough Starter

This is a re-post from my main blog. ENJOY! ~Michelle


I am going to be using my starter for some pretty awesome looking recipes I found online, as well as some of the Breaking Bread with Father Dominic books I have.

I intend on posting recipes that I make with the starter, and pics when I make them. Everyone in my family loves fresh baked bread and the smell is just the icing on the cake [besides eating] for me.


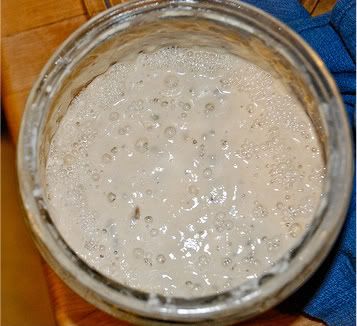
Here is the recipe for the starter itself, I personally made the one with Yeast, as I don't have the ability to leave the wild yeast starter on a window sill to feed itself, as it is middle of winter in Ohio. I used my crock pot insert without the glass lid, I covered with cheese cloth.

Below, a yeast starter and a starter without added yeast.


Ingredients:

* Yeast Starter:
* 1 pkg. active dry yeast
* 1/2 cup warm water
* 2 cups warm water
* 2 cups all purpose flour
* 1 tbs. granulated sugar or honey

Preparation:

Sprinkle the yeast over the first amount of warm water and sugar, stir and let set 10 mins. Add second amount of warm water and flour, beat until smooth, cover with a cheesecloth and let set in a warm place for several days ,stirring several times per day. When ready the starter should have a sour smell with small bubbles gently rising to the surface. The whole precess will take from 5 to 10 days depending to some extent on the time of year. Place in a jar and refrigerate.

TO REPLENISH
For each cup of starter used, add 3/4 cup of warm water , 3/4 cup of flour , 1 tsp. of sugar or honey and stir well. Cover loosely and allow to set at room temp. for AT LEAST one day. Refrigerate.

FEEDING: If starter is not used regularly stir in a tsp. of honey or sugar about every 10 days.


Non Yeast (Wild Yeast)

* 2 cups whole milk
* 2 cups flour

Let the milk set in a warm place such as sunny window uncovered to sour. Add the sour milk to the flour (instant potato flakes can be used) preferably in a crock or clay bowl. It is OK to mix the fresh milk and flour but it might take a day or so longer to get a good starter. Cover with cheesecloth and let stand in a warm place stirring occasionally and the rest is similar to the yeast type.

To replenish, add 1 cup of milk and one cup of flour, cover with cloth and let stand until bubbly. Refrigerate if not to be used for some time.

A bit of honey can be added to "feed" it and give a slightly less sour starter but it really is not required for the effectiveness if the starter.

~ ~ ~ ~ ~ ~


Hope everyone is staying warm and enjoying life to it's fullest.
So go get a nice hot cup of tea, cuddle up with a good book and pamper yourself for an hour, you'll thank yourself!

The future belongs to those who believe in the beauty of their dreams.
-Eleanor Roosevelt

Cheers,
~Breeze

Tuesday, February 24, 2009

~ Chocolate Cinnamon Scones ~

Chocolate Cinnamon Scones
Yields: At least 2 Dozen


Dry Ingredients:

• 3 ½ C Flour, All-Purpose
• ¼ C Sugar
• 3 T Baking Powder
• ¼ tsp Salt
• 1 tsp Ground Cinnamon

Additional Ingredients:
• 1 stick Butter, Cold
• 1 ¼ C Milk, Cold
• 1 ½ - 2 C Semi-Sweet Chocolate Chunks/Chips

Directions:
1. Pre-heat oven to 375 degrees.

2. In a mixer fitted with a paddle attachment (or a hand mixer), mix the DRY ingredients together.

3. Grab a stick of butter from the fridge and cut into pieces. With the mixer running add butter until course and ‘sandy’. You should still be able to see lumps of butter in the mixture.

4. Grab 1 ¼ C milk from the fridge and let mix until almost combined.

5. Add chocolate chunks (almost a full bag which is equal to 2 C). Mix just to distribute them evenly through the dough. DO NOT over mix.

6. Turn the dough onto a lightly floured surface & knead 10 times to bring it together.


7. Separate into 2 even pieces, and smooth out into circle shapes.


8. Using your hands or a rolling pin, roll or pat out to 1-inch thick.
** You may also roll out and cut with a round biscuit/cookie cutter.


9. Cut each circle in half, & cut into desired amount of pieces like a pie.
**The smaller the pieces, the more you need to watch the bake time.


Note: After transferring each piece to an un-greased cookie sheet, you may also brush an egg wash (1T water with one egg, beaten) over scones and top with sugar for a nice finished touch.


10. Bake until golden brown, about 15 minutes

I hope you and your company ENJOY these lovely and delicious scones.
They may be served alone for a quick snack or breakfast or with an entire breakfast/brunch spread.

**Project Note:
You can also put all dry ingredients into a wide mouth canning jar, and attach a recipe card with complete instructions for others to complete recipe. [They of course will provide the wet ingredients for recipe] Wrap a nice piece of cloth around lid and tie off with a piece of decorative string and attach recipe card, before giving.

~Breeze

Wednesday, February 11, 2009

Baking with Breeze


Baking is something I love to do.
So, with everything else I am posting on the other site that is serious, I thought better to just separate this and 'Go To Town' with some down home, full of love cooking, baking and having fun!

I also love to collect cook books and here's a tip for you, should you be looking for some choice books. Some of the best recipes you will find are in books you find at garage sales or thrift stores, the good ole fashioned ones.

I don't usually like to pay more than a couple dollars on older books, but on the odd occasion that it's a one of a kind I will give in.

Not that I am too much of a miser, but I love to spoil family and friends with things, so why should a book, unless it is new come to more than a dollar or two from my pocket? I also buy new ones and you might want to browse them or go to your local library to check out if there is more than one recipe you are gonna use, before you chuck down $30. for a new book.
Online avenues such as amazon.com and ebay are good sources, as long as you don't get stuck paying a ton for S/H.


I will be posting recipes - most of which I will have tried; and pictures for them, as I loooove to look at books with pictures for each recipe I see.

I love Kitchen Tips, Ideas, and Photos of awesome recipes; so anything you want to add, please feel free, because I am going to be posting a ton myself.

Cookies ~ Candy ~ Yeast Bread ~ Bread Machine Recipes ~ Brunch ~ Dinners & More!


Hope Your Home is Warm & Fuzzy.

I hope you enjoy your time here, and please stop back soon!!

With Love From My Home to Yours,
~Breeze